ReplyCX's Google Calendar integration allows visitors to connect their professional schedules within a single chat widget. This offers a seamless way to view availability and book appointments with the staff members of their choice in real time. By syncing slots across accounts, time management becomes automated and efficient.
Applications:
Appointment and Demo Booking
Collecting dates and availability from visitors
Automated meeting scheduling via WhatsApp, SMS, and Web Chat
Configuration:
Before adding the Google calendar to your bot flow, you must link your Google account to the platform. Google Calendar can be connected with ReplyCX in following ways:
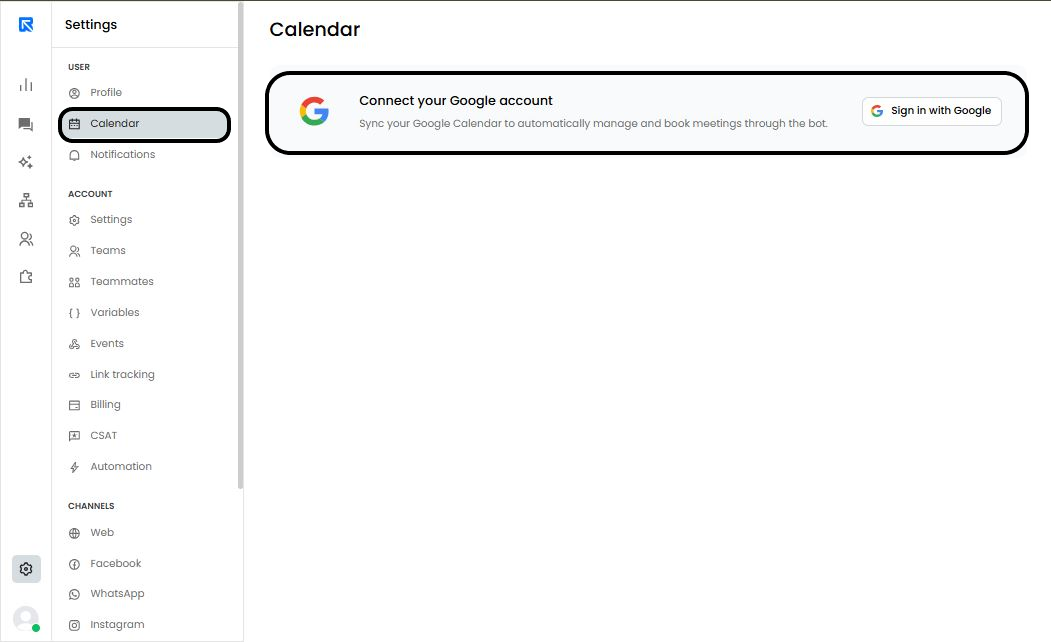
Step 1: Connecting Your Account
Go to 'Settings -> User -> Calendar'.
Click on 'Sign in with Google' to connect your account.
Grant the necessary permissions to allow the bot to manage events.
Choose the specific calendar where events should be booked and set your time zone.
Define your general availability (the timeslots that will be offered to visitors).
Step 2: Adding the Action Block to Your Flow
Once connected, you can deploy the calendar within a chatbot conversation after creating a chatbot flow.
In the Bot Builder canvas, click the '+' icon to add a new block.
Select Google Calendar from the action block menu.
Click on the block to open the configuration panel on the right side.
Step 3: Creating and Configuring an Event
An event is a template for the type of meeting you want to host.
Event Selection: Click '+ Create event' or choose an existing one. Give it a clear name (e.g., "Product Demo").
Team Assignment: Select the teammates or teams assigned to this event. Note: Only users who have connected their Google Calendars will appear in this list.
General Settings:
Feature | Description |
|---|---|
Slot Duration | The length or Duration of the meeting (Min: 5 mins, Max: 120 mins). |
Buffer Time | A gap or break between meetings to prevent back-to-back scheduling (Min: 5 mins, Max: 120 mins). |
Notice Time | Set the reminder about your meeting. You can set the minutes in the space before which you need to be notified about the scheduled meeting. |
Limit Future Booking | Define the number of calendar days where the slots need to be visible. |
Step 4: Setting Up Meeting Invites
Customize the automated invitation sent to both the staff member and the visitor.
Subject: Define the subject of the invitation to meeting which will be sent to you as well as the visitors. Use variables to personalize it (e.g., "Meeting with {user_name}").
Description: Provide context for the meeting.
Location: Enter a physical address or a virtual link (Google Meet/Zoom). If "Add Google Meet link" is toggled, this field may be managed automatically.
Step 5: Collecting Contact Details
To finalize the booking, the bot requires attendee information.
Mandatory Fields: Name and Email are required by default.
Custom Fields: Add 2–5 additional fields (like "Company Name" or "Phone Number") for better lead qualification.
Skip Form: Enable 'Skip form if data is present'. If the bot already collected the visitor's email earlier in the chat, it would skip these questions to improve the user experience.
WhatsApp & SMS Customization
If using this block on WhatsApp or SMS, you can customize the specific messages:
Date/Time Selection: Edit the question text and button labels.
Error Messages: Define what the bot says if an invalid selection is made.
Confirmation: The final success message sent once the slot is secured.
System Variables
Use these variables in subsequent blocks to reference the booking details:
gcal_selected_slot_time
gcal_selected_slot_date
gcal_selected_slot_day
Note: The block features two output ports:
Success (proceeds when booked)
Failure (proceeds if there is a technical error or no slots are available).
Steps for Creating the Event in Google Calendar:
1. Open Google Calendar from your Google Apps menu. The main calendar interface will load on your screen.
2. Click the Create button and select the Event option to begin scheduling your meeting.
3. Fill out the necessary details for your meeting, such as the event name, date, and time. Once everything is set, click Save.
4. After scheduling the meeting in Google Calendar, open ReplyCX Platform to integrate the Google Calendar block into your chatbot's conversation flow. Navigate to the Bot Builder and select the Google Calendar Action Block to open its configuration page.
5. Click Create Event and configure your meeting details. Enter a title in the Event name field. Under the Attendees section, select a single teammate or an entire team. You can also optionally select a specific calendar to check availability and book meetings.
(Note: You can only select team members or teams that are already configured within the ReplyCX platform.)