ReplyCX Documentation
Login
  • ⛩️Welcome to ReplyCX Knowledge Base! 📚
    • ReplyCX Basics
  • ▶️GETTING STARTED
    • Building a Chatbot
    • Testing a Chatbot
    • Channel Configurations
    • Deploying a Chatbot
    • Utility Tools
  • 🧩ACTION BLOCKS
    • Overview
    • Trigger
    • Send Message
    • Collect Input
    • Buttons
    • Carousel
    • Calendar
    • Send an Email
    • Condition
    • Image Carousel
    • Human Handover
    • Slider
    • Collect File
    • Delay
    • Form
    • Flow
    • Code-block
    • Options
    • Jump
    • List
    • Reply Button
    • AI Model
    • SET AI
    • Answer AI
    • AI AGENT
    • Webhook
    • Javascript
    • Send Status
    • Http Request
    • Dynamic data
    • Whatsapp flow
  • 🦾AI Studio
    • Building a GPT Chatbot
    • Knowledge Base
    • Training on historical live chat to generate response
    • Retrain frequency for URL data source
    • Custom Answers
    • Function Call
    • Prompts
    • Tokens
    • Setting up retrain
    • Advanced Crawling Criteria
  • ⛓️Integrations
    • Types of Integrations
    • Service Call
    • Google Sheets
      • Support for “Update Record” in Google Sheets
    • Codeblock
    • Google Calendar
    • Calendly
    • Zoho CRM
    • Hubspot
    • Dialog Flow
    • Events
    • Google Analytics
    • Freshdesk
    • Salesforce
    • Zapier
    • Airtable
    • Public API's
  • 🟢WhatsApp Business API
    • Prerequisites
    • WhatsApp Business API - Meta
    • Using a test WhatsApp Business API account
    • Product catalog on WhatsApp
    • Sync WhatsApp Template
    • Support for Carousel template message
  • Instagram
    • Using the Instagram Channel
  • 💬Live Chat
    • Overview
    • Saved Replies
    • Manage Saved Replies
    • Message status on live chat
    • Generating Response Using AI.
    • Rewriting existing response with AI
    • Labels
    • Managing Labels
    • Qualification details covered during a conversation
    • Settings
    • Filter conversations
    • Conversation History
    • Close a conversation
    • Related / Past Conversations
    • Elements on conversation card
    • Kind of Conversation Status
    • Copy Chat Transcript of a Conversation
    • Customize Live Chat Screen
    • Restart Conversation
    • Blocking Contacts
    • Agent status on live chat
  • ⚙️Troubleshooting
    • Variable Manager
    • Fallback Variables
    • Human Handover Configuration
    • Clone a bot
    • Preffered Image Dimensions
    • Working of Link Tracking
    • Setting up variables using trigger block
    • Availability of agents in Human Handover
    • Creating loop in the conversational flow
    • Requesting Edit Access
    • Cookies
  • 📢Outbound Bots
    • Outbound Action Blocks
      • Delay
      • Send WhatsApp
      • Send SMS
      • Send Email
    • Building a One-Off Campaign
    • Building a Ongoing Campaign
    • Creating WhatsApp Templates
  • 📱Chat Widget Customization
    • Embedding Chat Widgets
    • Customize Chat Widget UI using CSS
    • Display Chat Widget in iFrame
    • Change Appearance
    • Chat widget 3.0
  • 🏦Account Management
    • Manage Teams
    • Manage Teammates
    • Manage Roles
      • Channel configuration Permission
    • Opt Out Management
  • 📊Reporting
    • Custom Reports
    • Contacts Feature Recap
    • Scheduling Contact Report
    • Weekly Reports and Interactions
    • Export a contact list
    • Tracking link clicks on chatbot messages
    • Agent Report
    • AI Agent Report
    • Outbound Report
  • 🧑‍💻 Support
    • Forget Password
Powered by GitBook
On this page

Was this helpful?

  1. ACTION BLOCKS

Send Message

Send Message block is used for sending out informative messages that do not seek input from the visitors.

PreviousTriggerNextCollect Input

Last updated 11 months ago

Was this helpful?

Applications of this block:

Greeting your visitors, providing information about products and services - this action block offers multiple possibilities for engaging with customers. In addition to offering a warm welcome, it can also help inform potential buyers of what you have to offer.

The rich text editor supports all the languages i.e. now you can type your input in any language you want like French, Spanish etc.

Delay in sending messages on the basis of word count like if the content of the first message is large, the bot usually delays sending the second message for 2 to 5 seconds allowing the visitor time to read through the first message.

Setting up the block:

Step 1: Add the block on canvas by clicking on ‘+’.

Step 2: Select the "Send Message" block.

Step 3: Configure the message on the right panel.

3.1: Message:

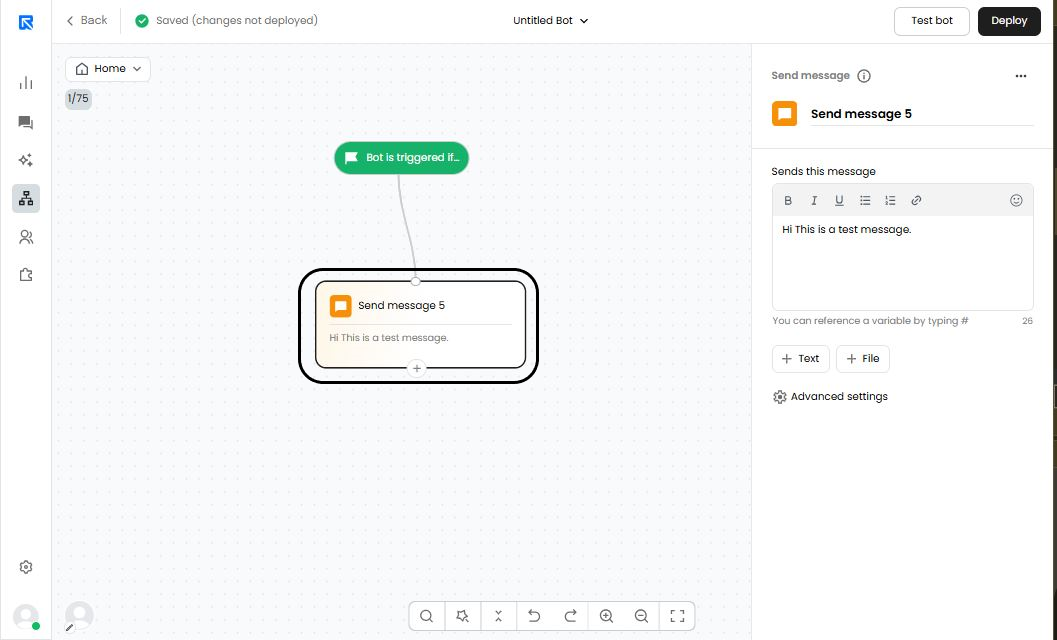
Click on 'Send Message' to configure the block.

You can set the message that you would like to send to the visitor. You can also use the variables to personalize the message.
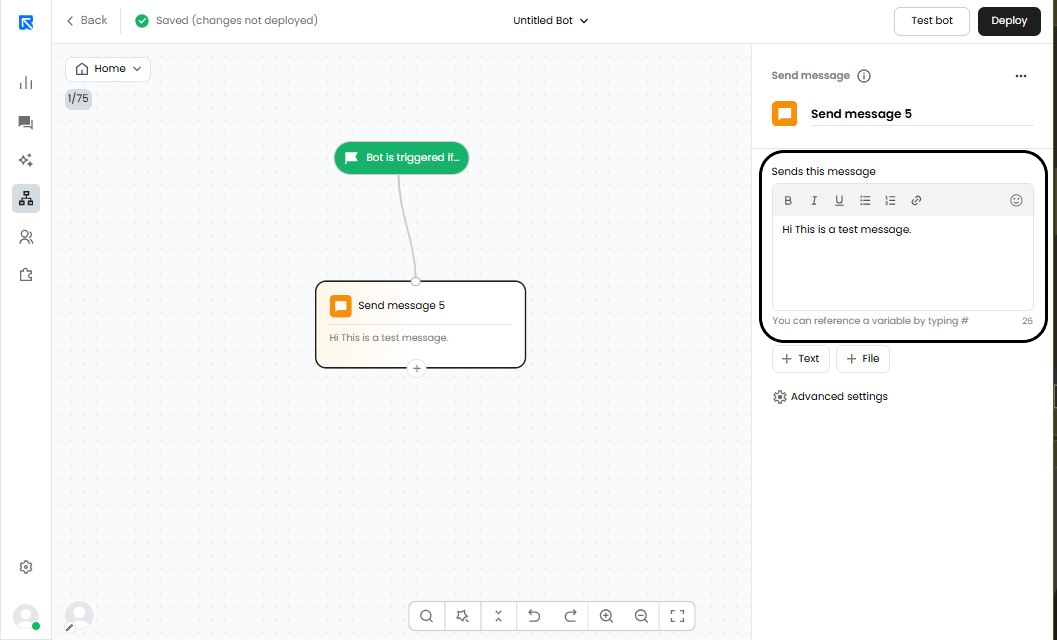
3.2: Adding a Text / File: Depending on your need, you can either add a text message by clicking on '+Text' or a media file as a message like GIFs or Image by clicking on '+File'.
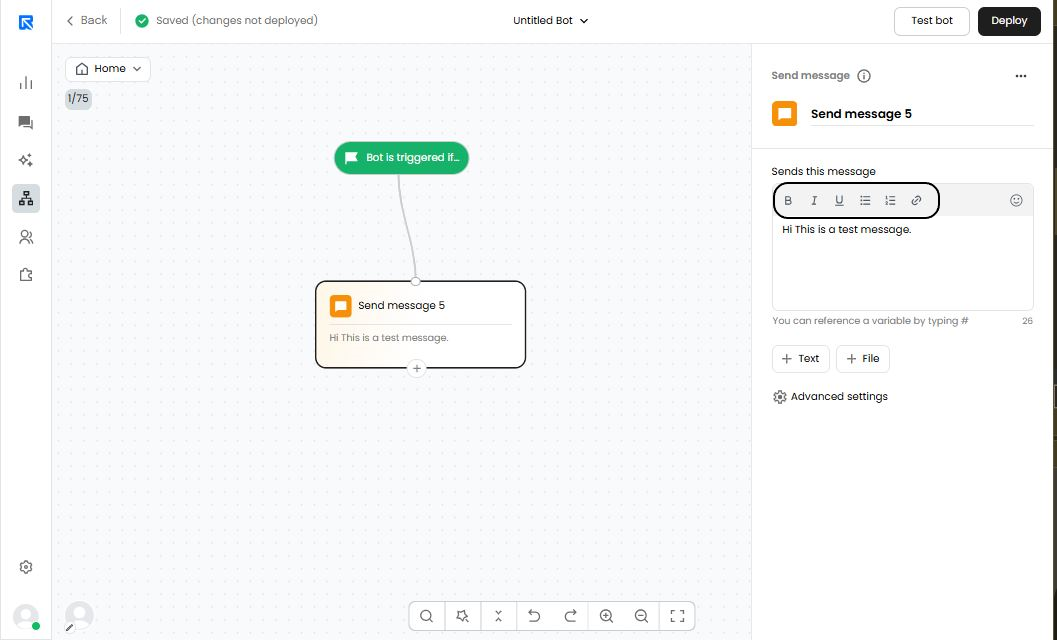
Various Formatting Options available are:

In the rich text editor, you can format your text using the formatting bar. It allows you to display your message to the user either in Bold or Italics letters or even underline the selected part of the message. It also allows you to send the message in the bullet points or attach a 🔗link with the selected text.

  • Bold ( B ) - Formats the text into Bold letters

  • Italics ( I ) - Formats the text into Italics

  • Underline ( U ) - Underlines the text

  • Bullet Points ( : ) - Formats the text into bullet points

  • Link (🔗) - Allows text to be linked with web page or website.

You can add the link of your choice by selecting the word with which you want to attach the link.

Extra Options:

You can create a bullet point list in the message itself!

You can also add emojis to make the conversation more casual and friendly

We do support up to 999 characters however we do recommend not to have more than 160 characters in a single message since anything more than this could impede the user experience

Re-arranging the messages:

The sequence of the messages can also be changed as per your need. You can hover over the block till the arrows are visible on the left of the input space, left click on arrow (hold), drag (upwards or downwards) & release it to the position as per the new sequence defined.

🧩