ReplyCX Documentation
Login
  • ⛩️Welcome to ReplyCX Knowledge Base! 📚
    • ReplyCX Basics
  • ▶️GETTING STARTED
    • Building a Chatbot
    • Testing a Chatbot
    • Channel Configurations
    • Deploying a Chatbot
    • Utility Tools
  • 🧩ACTION BLOCKS
    • Overview
    • Trigger
    • Send Message
    • Collect Input
    • Buttons
    • Carousel
    • Calendar
    • Send an Email
    • Condition
    • Image Carousel
    • Human Handover
    • Slider
    • Collect File
    • Delay
    • Form
    • Flow
    • Code-block
    • Options
    • Jump
    • List
    • Reply Button
    • AI Model
    • SET AI
    • Answer AI
    • AI AGENT
    • Webhook
    • Javascript
    • Send Status
    • Http Request
    • Dynamic data
    • Whatsapp flow
  • 🦾AI Studio
    • Building a GPT Chatbot
    • Knowledge Base
    • Training on historical live chat to generate response
    • Retrain frequency for URL data source
    • Custom Answers
    • Function Call
    • Prompts
    • Tokens
    • Setting up retrain
    • Advanced Crawling Criteria
  • ⛓️Integrations
    • Types of Integrations
    • Service Call
    • Google Sheets
      • Support for “Update Record” in Google Sheets
    • Codeblock
    • Google Calendar
    • Calendly
    • Zoho CRM
    • Hubspot
    • Dialog Flow
    • Events
    • Google Analytics
    • Freshdesk
    • Salesforce
    • Zapier
    • Airtable
    • Public API's
  • 🟢WhatsApp Business API
    • Prerequisites
    • WhatsApp Business API - Meta
    • Using a test WhatsApp Business API account
    • Product catalog on WhatsApp
    • Sync WhatsApp Template
    • Support for Carousel template message
  • Instagram
    • Using the Instagram Channel
  • 💬Live Chat
    • Overview
    • Saved Replies
    • Manage Saved Replies
    • Message status on live chat
    • Generating Response Using AI.
    • Rewriting existing response with AI
    • Labels
    • Managing Labels
    • Qualification details covered during a conversation
    • Settings
    • Filter conversations
    • Conversation History
    • Close a conversation
    • Related / Past Conversations
    • Elements on conversation card
    • Kind of Conversation Status
    • Copy Chat Transcript of a Conversation
    • Customize Live Chat Screen
    • Restart Conversation
    • Blocking Contacts
    • Agent status on live chat
  • ⚙️Troubleshooting
    • Variable Manager
    • Fallback Variables
    • Human Handover Configuration
    • Clone a bot
    • Preffered Image Dimensions
    • Working of Link Tracking
    • Setting up variables using trigger block
    • Availability of agents in Human Handover
    • Creating loop in the conversational flow
    • Requesting Edit Access
    • Cookies
  • 📢Outbound Bots
    • Outbound Action Blocks
      • Delay
      • Send WhatsApp
      • Send SMS
      • Send Email
    • Building a One-Off Campaign
    • Building a Ongoing Campaign
    • Creating WhatsApp Templates
  • 📱Chat Widget Customization
    • Embedding Chat Widgets
    • Customize Chat Widget UI using CSS
    • Display Chat Widget in iFrame
    • Change Appearance
    • Chat widget 3.0
  • 🏦Account Management
    • Manage Teams
    • Manage Teammates
    • Manage Roles
      • Channel configuration Permission
    • Opt Out Management
  • 📊Reporting
    • Custom Reports
    • Contacts Feature Recap
    • Scheduling Contact Report
    • Weekly Reports and Interactions
    • Export a contact list
    • Tracking link clicks on chatbot messages
    • Agent Report
    • AI Agent Report
    • Outbound Report
  • 🧑‍💻 Support
    • Forget Password
Powered by GitBook
On this page
  • Scheduling the contact report:
  • Modifying / Canceling the scheduled reports:

Was this helpful?

  1. Reporting

Scheduling Contact Report

PreviousContacts Feature RecapNextWeekly Reports and Interactions

Last updated 1 year ago

Was this helpful?

Scheduled contact reports are nothing but an automated process of exporting reports by automatically sending you the reports either daily / weekly.

Users can schedule the report, the users can follow the steps given below:

Scheduling the contact report:

In-order to schedule the report, follow the below steps:

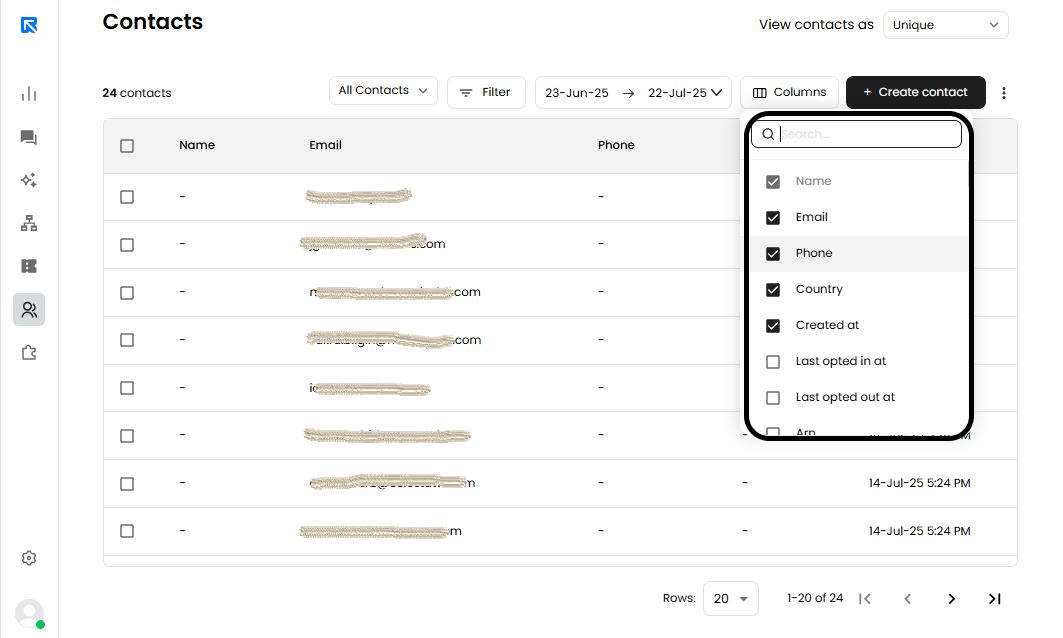
  1. Select the ‘columns’ that you want it to be part of the report.

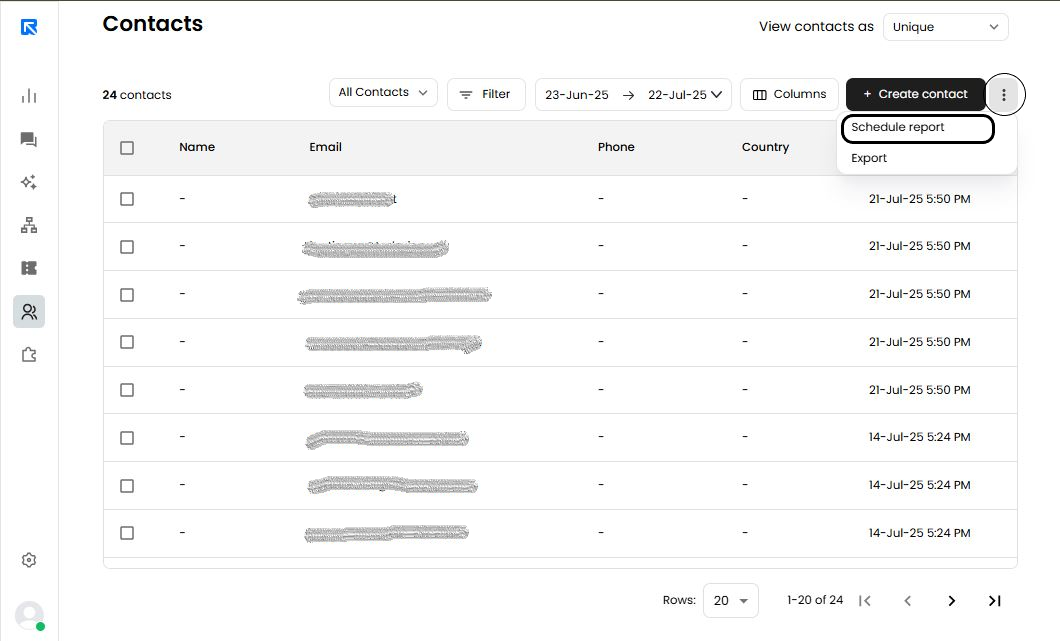
  2. Click on the three dots on the top right corner and select ‘schedule report’ option.

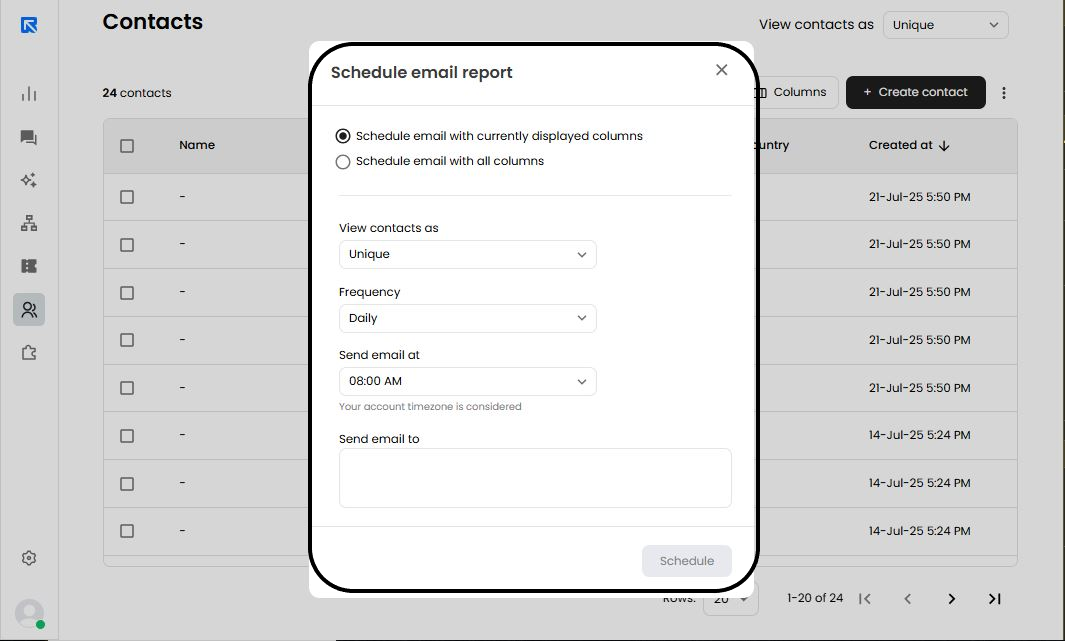
  3. Customize the report with the available options i.e., report with the unique contacts, frequency the report, time to receive the report, stakeholders whom the report needs to be shared with etc., & click on ‘schedule’ again to schedule the report.

Modifying / Canceling the scheduled reports:

To modify or cancel the schedule, follow the same steps again i.e., click on the three dots in the top right corner and select ‘schedule reports’ & click on ‘modify’ or ‘cancel’, post making changes in the selection.

📊