ReplyCX Documentation
Login
  • ⛩️Welcome to ReplyCX Knowledge Base! 📚
    • ReplyCX Basics
  • ▶️GETTING STARTED
    • Building a Chatbot
    • Testing a Chatbot
    • Channel Configurations
    • Deploying a Chatbot
    • Utility Tools
  • 🧩ACTION BLOCKS
    • Overview
    • Trigger
    • Send Message
    • Collect Input
    • Buttons
    • Carousel
    • Calendar
    • Send an Email
    • Condition
    • Image Carousel
    • Human Handover
    • Slider
    • Collect File
    • Delay
    • Form
    • Flow
    • Code-block
    • Options
    • Jump
    • List
    • Reply Button
    • AI Model
    • SET AI
    • Answer AI
    • AI AGENT
    • Webhook
    • Javascript
    • Send Status
    • Http Request
    • Dynamic data
    • Whatsapp flow
  • 🦾AI Studio
    • Building a GPT Chatbot
    • Knowledge Base
    • Training on historical live chat to generate response
    • Retrain frequency for URL data source
    • Custom Answers
    • Function Call
    • Prompts
    • Tokens
    • Setting up retrain
    • Advanced Crawling Criteria
  • ⛓️Integrations
    • Types of Integrations
    • Service Call
    • Google Sheets
      • Support for “Update Record” in Google Sheets
    • Codeblock
    • Google Calendar
    • Calendly
    • Zoho CRM
    • Hubspot
    • Dialog Flow
    • Events
    • Google Analytics
    • Freshdesk
    • Salesforce
    • Zapier
    • Airtable
    • Public API's
  • 🟢WhatsApp Business API
    • Prerequisites
    • WhatsApp Business API - Meta
    • Using a test WhatsApp Business API account
    • Product catalog on WhatsApp
    • Sync WhatsApp Template
    • Support for Carousel template message
  • Instagram
    • Using the Instagram Channel
  • 💬Live Chat
    • Overview
    • Saved Replies
    • Manage Saved Replies
    • Message status on live chat
    • Generating Response Using AI.
    • Rewriting existing response with AI
    • Labels
    • Managing Labels
    • Qualification details covered during a conversation
    • Settings
    • Filter conversations
    • Conversation History
    • Close a conversation
    • Related / Past Conversations
    • Elements on conversation card
    • Kind of Conversation Status
    • Copy Chat Transcript of a Conversation
    • Customize Live Chat Screen
    • Restart Conversation
    • Blocking Contacts
    • Agent status on live chat
    • Edit Variables in Closed Chat
  • ⚙️Troubleshooting
    • Variable Manager
    • Fallback Variables
    • Human Handover Configuration
    • Clone a bot
    • Preffered Image Dimensions
    • Working of Link Tracking
    • Setting up variables using trigger block
    • Availability of agents in Human Handover
    • Creating loop in the conversational flow
    • Requesting Edit Access
    • Cookies
    • Creating Custom Role
  • 📢Outbound Bots
    • Outbound Action Blocks
      • Delay
      • Send WhatsApp
      • Send SMS
      • Send Email
    • Building a One-Off Campaign
    • Building a Ongoing Campaign
    • Creating WhatsApp Templates
  • 📱Chat Widget Customization
    • Embedding Chat Widgets
    • Customize Chat Widget UI using CSS
    • Display Chat Widget in iFrame
    • Change Appearance
    • Chat widget 3.0
  • 🏦Account Management
    • Manage Teams
    • Manage Teammates
    • Manage Roles
      • Channel configuration Permission
    • Opt Out Management
  • 📊Reporting
    • Custom Reports
    • Contacts Feature Recap
    • Scheduling Contact Report
    • Weekly Reports and Interactions
    • Export a contact list
    • Tracking link clicks on chatbot messages
    • Agent Report
    • AI Agent Report
    • Outbound Report
  • 🧑‍💻 Support
    • Forget Password
Powered by GitBook
On this page
  • Embedding Chat Widgets
  • Benefits of embedding a chatbot:
  • Ways to embed a chat widget:
  • Embedding the chat widget:

Was this helpful?

  1. Chat Widget Customization

Embedding Chat Widgets

Embedding Chat Widgets

With this functionality, you can now embed your chatbots as a section on a webpage just like how you see images on blogs.

This will also allow you to have multiple chatbots on different sections of a page in order to interact with your visitors without any additional CSS/HTML efforts from your end.

Benefits of embedding a chatbot:

  • Improves UX with an immersive view

  • Make your content interactive

  • Embed multiple bots on a single page

  • Ability to trigger certain bot only on certain section based on trigger condition

Ways to embed a chat widget:

There are two ways through which the chatbot can be embedded.
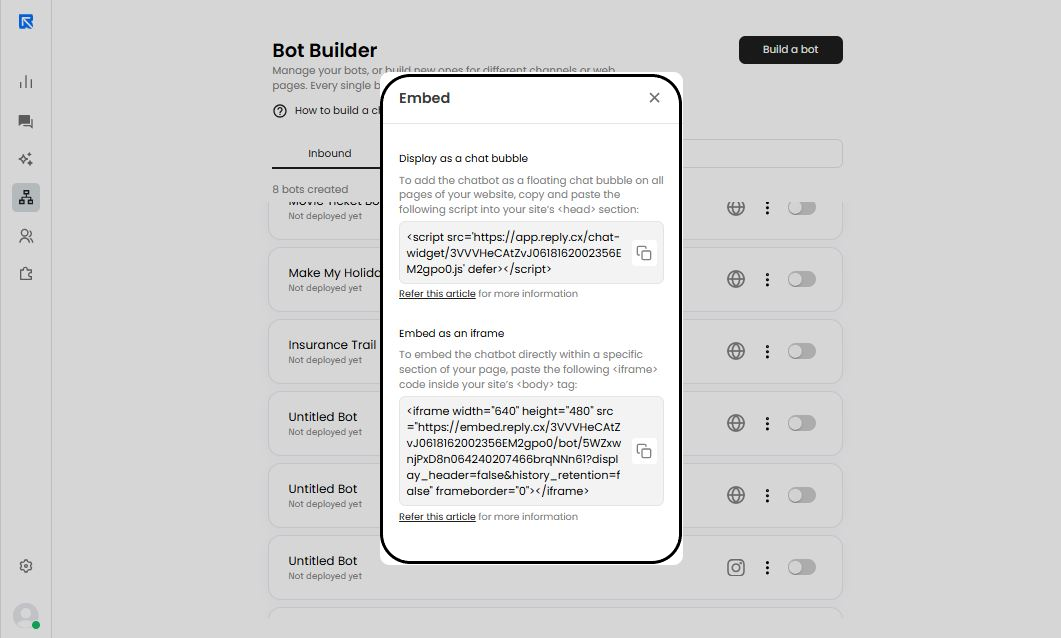
As a chat bubble:

This will allow you to view the chatbot as a chat bubble. You can either have in on one page or on multiple pages based on your preference. All you need to do is copy the following snippet on the pages of your website as per your preference.

As an iFrame:

This will allow you to embed the chatbot on the particular section of the page. All you need to do is copy the following snippet on the page of your website as per your preference.

You can modify the Width & Height using width & height field based on your preference in the following snippet

You can also hide or show the Header of the chatbot using the 'display_header' field based on your preference. By default, it will be off.

Embedding the chat widget:

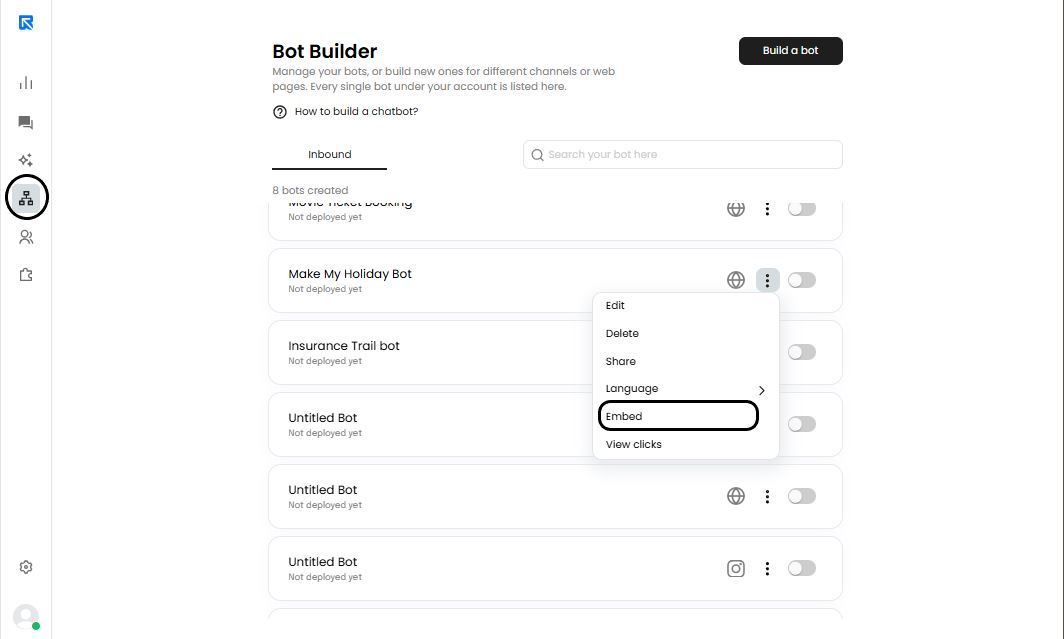
In order to embed a chat widget on your website, you can follow the steps below:

  1. Go to the 'Bot Builder' section.

  2. Select the chatbot which you want to embed and click on the 'Actions' button.

  3. A drop-down list will appear with various options. Select the 'Embed' option.

  4. Click on the ‘Two Page’ icon to copy the code provided for displaying it as a chat bubble.

    You can paste it either on all the pages or on selective pages.

PreviousCreating WhatsApp TemplatesNextCustomize Chat Widget UI using CSS

Last updated 1 year ago

Was this helpful?

📱