ReplyCX Documentation
Login
  • ⛩️Welcome to ReplyCX Knowledge Base! 📚
    • ReplyCX Basics
  • ▶️GETTING STARTED
    • Building a Chatbot
    • Testing a Chatbot
    • Channel Configurations
    • Deploying a Chatbot
    • Utility Tools
  • 🧩ACTION BLOCKS
    • Overview
    • Trigger
    • Send Message
    • Collect Input
    • Buttons
    • Carousel
    • Calendar
    • Send an Email
    • Condition
    • Image Carousel
    • Human Handover
    • Slider
    • Collect File
    • Delay
    • Form
    • Flow
    • Code-block
    • Options
    • Jump
    • List
    • Reply Button
    • AI Model
    • SET AI
    • Answer AI
    • AI AGENT
    • Webhook
    • Javascript
    • Send Status
    • Http Request
    • Dynamic data
    • Whatsapp flow
  • 🦾AI Studio
    • Building a GPT Chatbot
    • Knowledge Base
    • Training on historical live chat to generate response
    • Retrain frequency for URL data source
    • Custom Answers
    • Function Call
    • Prompts
    • Tokens
    • Setting up retrain
    • Advanced Crawling Criteria
  • ⛓️Integrations
    • Types of Integrations
    • Service Call
    • Google Sheets
      • Support for “Update Record” in Google Sheets
    • Codeblock
    • Google Calendar
    • Calendly
    • Zoho CRM
    • Hubspot
    • Dialog Flow
    • Events
    • Google Analytics
    • Freshdesk
    • Salesforce
    • Zapier
    • Airtable
    • Public API's
  • 🟢WhatsApp Business API
    • Prerequisites
    • WhatsApp Business API - Meta
    • Using a test WhatsApp Business API account
    • Product catalog on WhatsApp
    • Sync WhatsApp Template
    • Support for Carousel template message
  • Instagram
    • Using the Instagram Channel
  • 💬Live Chat
    • Overview
    • Saved Replies
    • Manage Saved Replies
    • Message status on live chat
    • Generating Response Using AI.
    • Rewriting existing response with AI
    • Labels
    • Managing Labels
    • Qualification details covered during a conversation
    • Settings
    • Filter conversations
    • Conversation History
    • Close a conversation
    • Related / Past Conversations
    • Elements on conversation card
    • Kind of Conversation Status
    • Copy Chat Transcript of a Conversation
    • Customize Live Chat Screen
    • Restart Conversation
    • Blocking Contacts
    • Agent status on live chat
    • Edit Variables in Closed Chat
  • ⚙️Troubleshooting
    • Variable Manager
    • Fallback Variables
    • Human Handover Configuration
    • Clone a bot
    • Preffered Image Dimensions
    • Working of Link Tracking
    • Setting up variables using trigger block
    • Availability of agents in Human Handover
    • Creating loop in the conversational flow
    • Requesting Edit Access
    • Cookies
    • Creating Custom Role
  • 📢Outbound Bots
    • Outbound Action Blocks
      • Delay
      • Send WhatsApp
      • Send SMS
      • Send Email
    • Building a One-Off Campaign
    • Building a Ongoing Campaign
    • Creating WhatsApp Templates
  • 📱Chat Widget Customization
    • Embedding Chat Widgets
    • Customize Chat Widget UI using CSS
    • Display Chat Widget in iFrame
    • Change Appearance
    • Chat widget 3.0
  • 🏦Account Management
    • Manage Teams
    • Manage Teammates
    • Manage Roles
      • Channel configuration Permission
    • Opt Out Management
  • 📊Reporting
    • Custom Reports
    • Contacts Feature Recap
    • Scheduling Contact Report
    • Weekly Reports and Interactions
    • Export a contact list
    • Tracking link clicks on chatbot messages
    • Agent Report
    • AI Agent Report
    • Outbound Report
  • 🧑‍💻 Support
    • Forget Password
Powered by GitBook
On this page
  • About Chat Widget:
  • Customizing the look of the Chat Widget:
  • Changing the appearance of the chat widget:

Was this helpful?

  1. Chat Widget Customization

Change Appearance

PreviousDisplay Chat Widget in iFrameNextChat widget 3.0

Last updated 1 year ago

Was this helpful?

About Chat Widget:

It is a small icon typically visible on the bottom right/left corner of your screen that works as a trigger point to initiate the conversation with the bot/human.

Customizing the look of the Chat Widget:

You can customize the look of the chat widget as per your preference.

ReplyCX provides various options to customize the chat widget and make it more attractive as per their preference.

Below we have explained how the look of the chat widget can be changed with ReplyCX.

Changing the appearance of the chat widget:

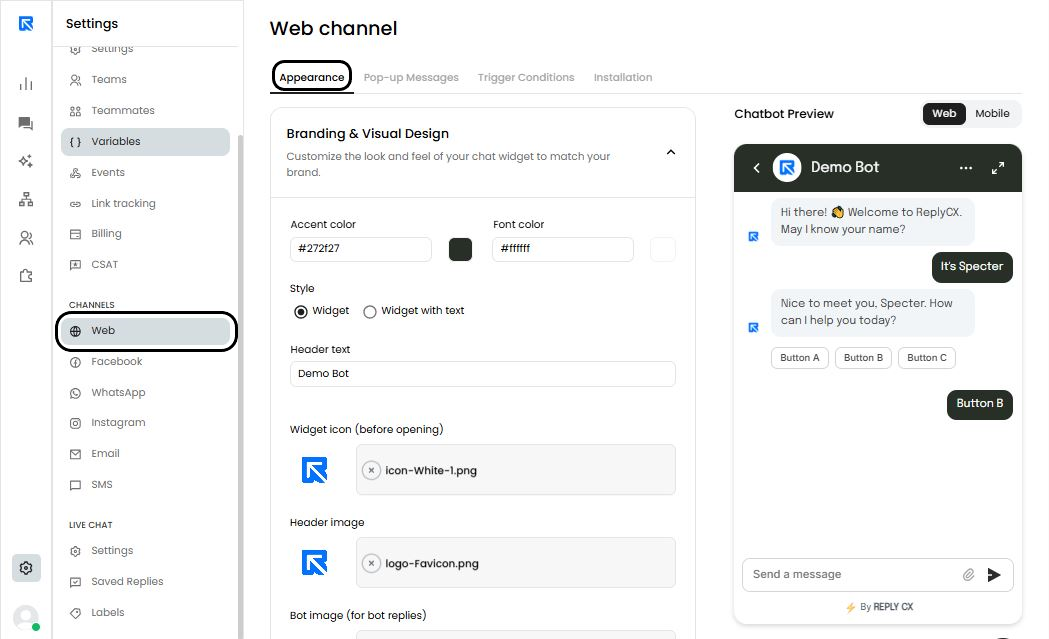
To access the appearance screen:

  1. Click on 'Channel Configuration' on the left menu panel.

  2. Click on the down arrow near 'Web' section to see the available options. Click on 'Appearance'.

    1. Widget Icon: You can now have your own widget icon that will appear on your webpage / website. Click on ‘Upload an image’ to change your bot widget icon.

    2. Header Text:

      This option allows the users to name the bot.

    3. Header Logo:

      This option allows the user to have the profile image for the bot. This allows the user to set the photo that best suits the name of the bot.

    4. Bot Icon:

      Users will be able to set the bot icon that will be visible to the visitors.

    5. Hint Text:

      This option allows the users to set the text they would like to show to their visitors.

    6. Accent Color: This option allows users to set the color of the bot & provides them the option to choose the color that complements their brand color on their website. Users can also set the colors of the font and match with their primary colors.

    7. Chat Widget Position: You can change the position of the chat widget & set it either on the right or left depending upon your preference. ReplyCX provides the option “Chat Interface Position” to set the chat widget either on the bottom left of the screen or bottom right of the screen.

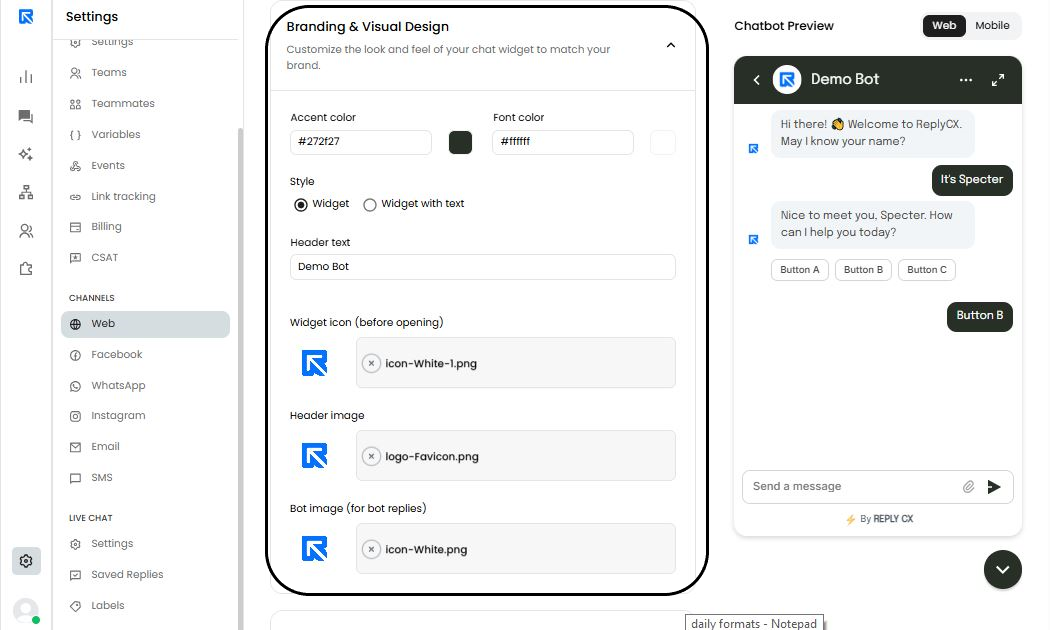
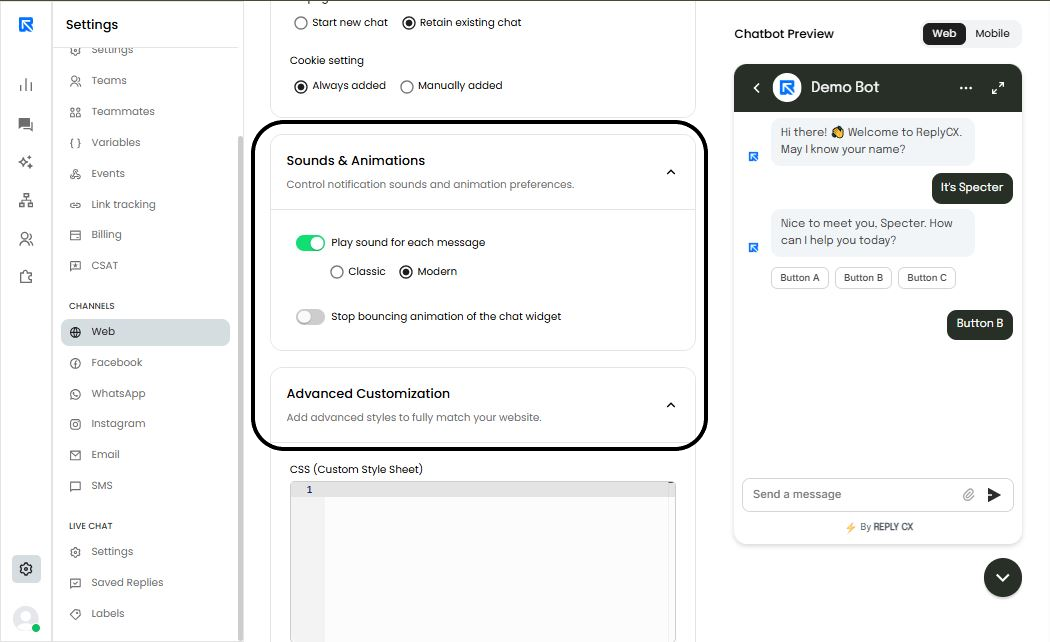
  3. Notifying visitors when they receive a message from bot: With ReplyCX, users do not have the option to turn on / turn off the notification sound however we do recommend our users to keep this on since the sound will support the bot to get better engagement and grab visitor’s attention.

  4. Tick / Untick to enable or disable the message sent sound.

📱