ReplyCX Documentation
Login
  • ⛩️Welcome to ReplyCX Knowledge Base! 📚
    • ReplyCX Basics
  • ▶️GETTING STARTED
    • Building a Chatbot
    • Testing a Chatbot
    • Channel Configurations
    • Deploying a Chatbot
    • Utility Tools
  • 🧩ACTION BLOCKS
    • Overview
    • Trigger
    • Send Message
    • Collect Input
    • Buttons
    • Carousel
    • Calendar
    • Send an Email
    • Condition
    • Image Carousel
    • Human Handover
    • Slider
    • Collect File
    • Delay
    • Form
    • Flow
    • Code-block
    • Options
    • Jump
    • List
    • Reply Button
    • AI Model
    • SET AI
    • Answer AI
    • AI AGENT
    • Webhook
    • Javascript
    • Send Status
    • Http Request
    • Dynamic data
    • Whatsapp flow
  • 🦾AI Studio
    • Building a GPT Chatbot
    • Knowledge Base
    • Training on historical live chat to generate response
    • Retrain frequency for URL data source
    • Custom Answers
    • Function Call
    • Prompts
    • Tokens
    • Setting up retrain
    • Advanced Crawling Criteria
  • ⛓️Integrations
    • Types of Integrations
    • Service Call
    • Google Sheets
      • Support for “Update Record” in Google Sheets
    • Codeblock
    • Google Calendar
    • Calendly
    • Zoho CRM
    • Hubspot
    • Dialog Flow
    • Events
    • Google Analytics
    • Freshdesk
    • Salesforce
    • Zapier
    • Airtable
    • Public API's
  • 🟢WhatsApp Business API
    • Prerequisites
    • WhatsApp Business API - Meta
    • Using a test WhatsApp Business API account
    • Product catalog on WhatsApp
    • Sync WhatsApp Template
    • Support for Carousel template message
  • Instagram
    • Using the Instagram Channel
  • 💬Live Chat
    • Overview
    • Saved Replies
    • Manage Saved Replies
    • Message status on live chat
    • Generating Response Using AI.
    • Rewriting existing response with AI
    • Labels
    • Managing Labels
    • Qualification details covered during a conversation
    • Settings
    • Filter conversations
    • Conversation History
    • Close a conversation
    • Related / Past Conversations
    • Elements on conversation card
    • Kind of Conversation Status
    • Copy Chat Transcript of a Conversation
    • Customize Live Chat Screen
    • Restart Conversation
    • Blocking Contacts
    • Agent status on live chat
  • ⚙️Troubleshooting
    • Variable Manager
    • Fallback Variables
    • Human Handover Configuration
    • Clone a bot
    • Preffered Image Dimensions
    • Working of Link Tracking
    • Setting up variables using trigger block
    • Availability of agents in Human Handover
    • Creating loop in the conversational flow
    • Requesting Edit Access
    • Cookies
  • 📢Outbound Bots
    • Outbound Action Blocks
      • Delay
      • Send WhatsApp
      • Send SMS
      • Send Email
    • Building a One-Off Campaign
    • Building a Ongoing Campaign
    • Creating WhatsApp Templates
  • 📱Chat Widget Customization
    • Embedding Chat Widgets
    • Customize Chat Widget UI using CSS
    • Display Chat Widget in iFrame
    • Change Appearance
    • Chat widget 3.0
  • 🏦Account Management
    • Manage Teams
    • Manage Teammates
    • Manage Roles
      • Channel configuration Permission
    • Opt Out Management
  • 📊Reporting
    • Custom Reports
    • Contacts Feature Recap
    • Scheduling Contact Report
    • Weekly Reports and Interactions
    • Export a contact list
    • Tracking link clicks on chatbot messages
    • Agent Report
    • AI Agent Report
    • Outbound Report
  • 🧑‍💻 Support
    • Forget Password
Powered by GitBook
On this page

Was this helpful?

  1. Outbound Bots
  2. Outbound Action Blocks

Send WhatsApp

Send WhatsApp Campaigns to your Customers

PreviousDelayNextSend SMS

Last updated 2 months ago

Was this helpful?

This action block allows you to:

  • Send birthday reminders.

  • Promotional messages to a group of prospects/customers etc.

  • Feedback surveys.

  • Appointment booking confirmation.

  • and a whole lot more…

Setting up the block and configurations:

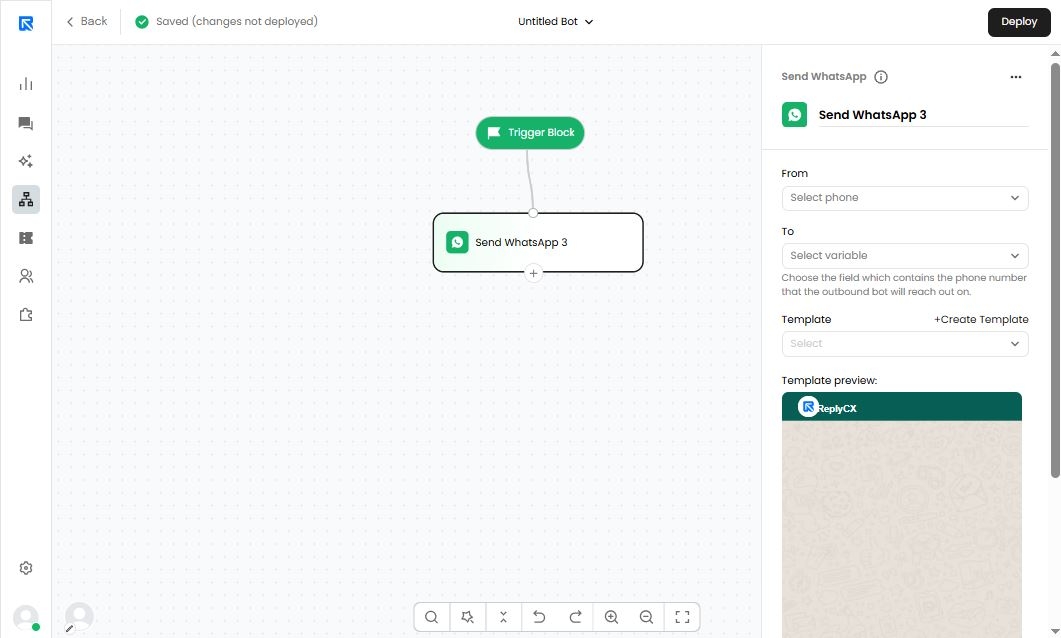
  1. Start by adding the action block on canvas.

  2. Click on Send WhatsApp 1 block to open configuration panel on right side of the screen.

  1. Before setting up the block, you need to configure the WhatsApp channel. Go to Channel Configurations -> WhatsApp.

    1. API Configuration: Click on +WhatsApp Configuration to configure the WhatsApp API then, fill the following details:

    2. Template Messages:

      • 'Add’ and ‘Remove’ the templates.

      • Status of the templates created, refresh status.

      • Preview of the message template.

  2. After all the configurations are done, go back to your outbound bot to further continue the configuration of the following details:

    1. Configure WhatsApp Number: Choose the configured WhatsApp number from which the WhatsApp message and the campaigns will be sent.

    2. Click on the 'To' field to assign the visitor contact numbers.

      This dropdown list shows you all the variables which are available in your account. Choose the variable which contains the phone number of people you want to reach out.

    3. Choose template: Choose a 'Template message' from the list (You can also create a new template message by clicking on the 'Create template' button).

    4. Preview of how the message will look like.

    5. Track links in this message: Enables link tracking on the message.

If you find the dropdowns empty, it means that you have not configured the WhatsApp Business API on ReplyCX. To enable this API, head over to Channel Configuration → WhatsApp and configure your WhatsApp Business API.

You can contact our sales team to purchase a WhatsApp Business API

📢